Resize your images with our free, easy-to-use image resizer! In just a couple of minutes, you’ll get pictures of the right size, and they will be ready for uploading. We support all major image formats - JPEG, PNG, WEBP, HEIC, GIF, and BMP. No matter where you share your visual content - social media, websites, or blogs - it will always look crisp, sharp, and stunning.
Upload photos
Upload your images any way you like - from your device, a cloud storage, or even via a web link.
There are no limits on the size of your images in the free version.
No ads or pop-ups. No registration required. No watermarks will be added to your resized pictures.
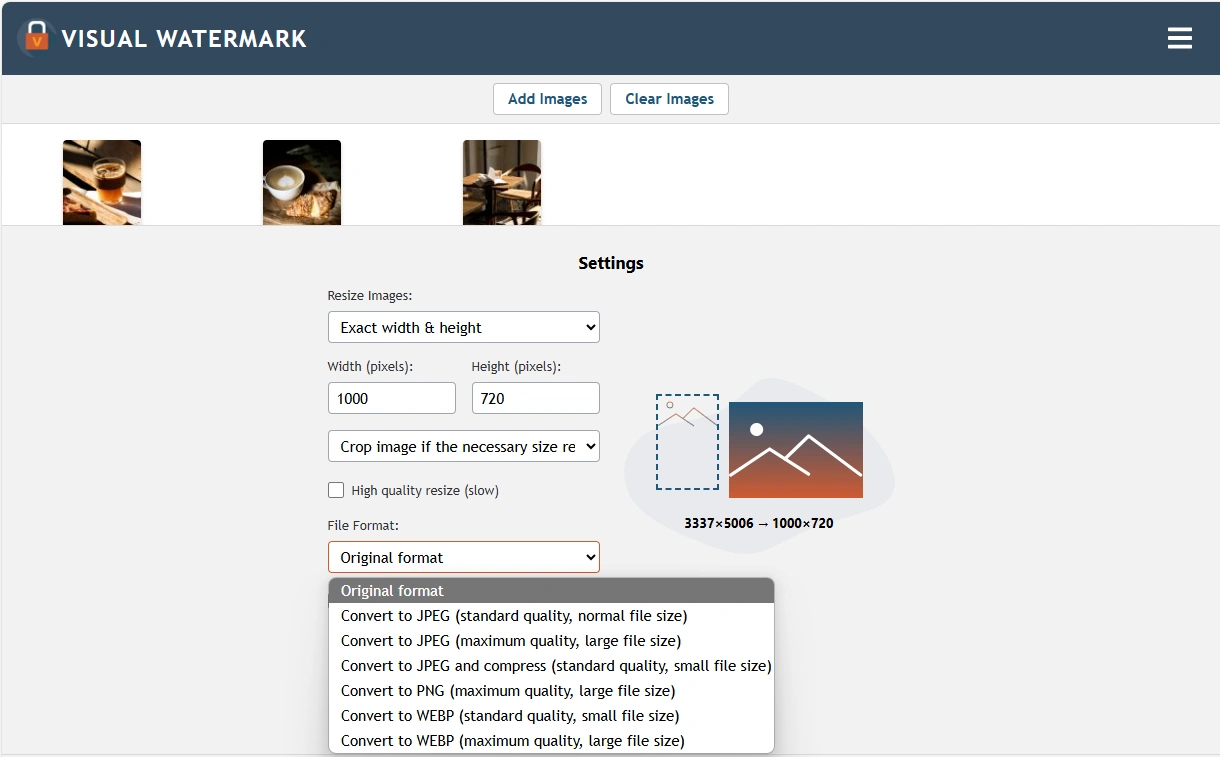
Set the desired size
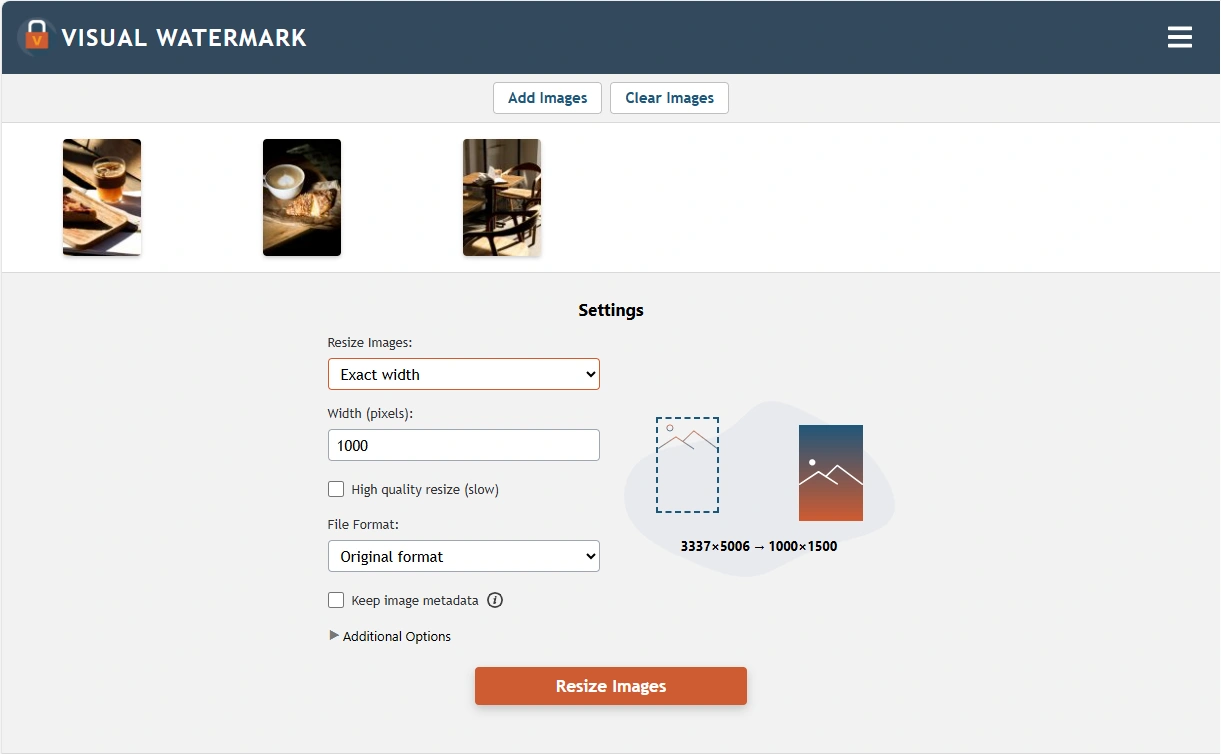
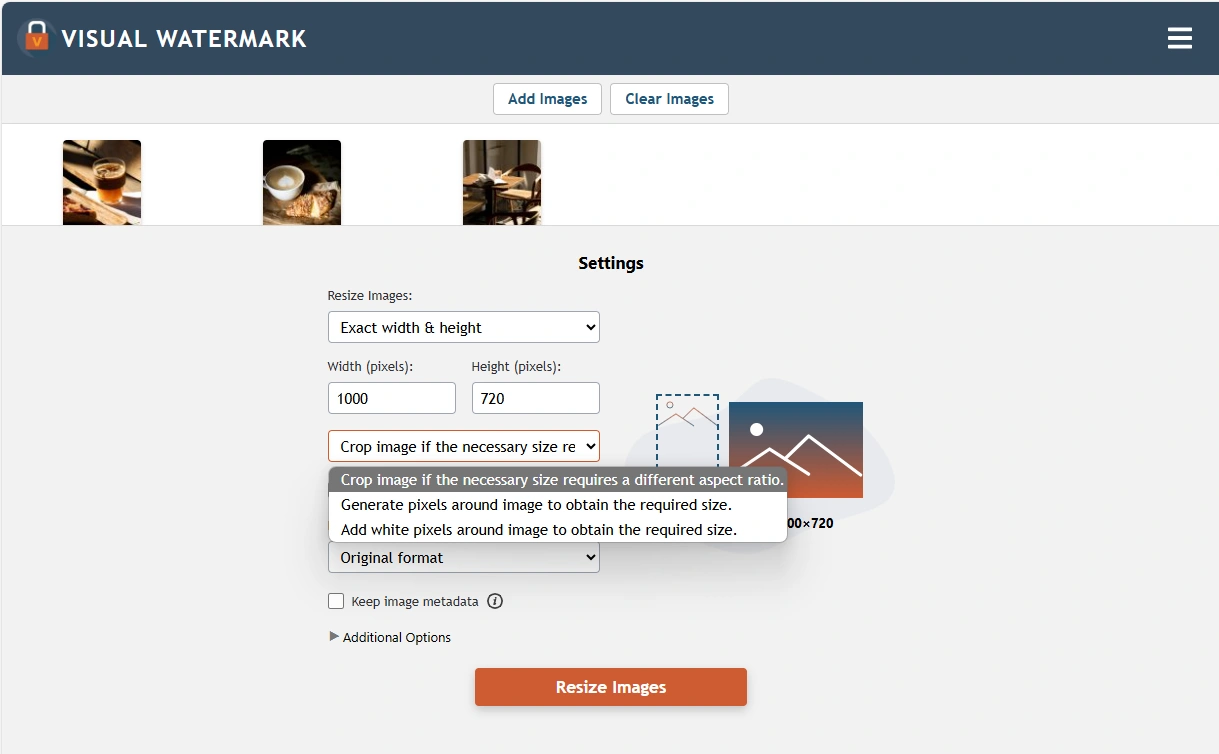
Our online image resizer provides you with control and flexibility. You can enter a new value for height or width, change both pixel dimensions or reduce the overall image size by a certain percentage. There is an option to upscale an image, as well.
The app will make sure that your images will have the highest possible quality after processing.

Export images
Once you’ve set your preferences, hit the 'Resize Images' button, then download the results.
Your resizing settings will be automatically saved, which is very convenient if you resize images the same way on regular basis. You won’t have to enter the necessary values all over again.
Since our Resize Photo app is browser-based, you won’t have to download or install it. Instead, you can simply open it and get to work.
Visual Watermark’s image resizer makes it possible to change pixel dimensions of an image for free, with minimum effort and in the blink of an eye. Our app is not only unbelievably simple to use, but also extraordinarily fast. Here’s why you should choose it.
Resize Photos with Precision Image Optimization Tool Simple, Free & Safe
Take Full Control of Image Size & Quality
Do you need your images to meet certain size requirements? Do you want to easily make a photo smaller or bigger without any pixelation or blurring? Our app is a great choice for these tasks.
You can:
Moreover, the Export settings include a live preview which will show you what pixel dimensions your image will have after the processing is done. This way, there will be no unpleasant surprises.

The most user friendly website I have used!!! They literally couldn't make it easier to get the job done. THANK YOU designers!!!!!
Joanie, United States
Perfect Solution for Image Optimization
Our app is more than just a basic image resizer - it provides a convenient and uncomplicated way to optimize your visual content for the web.
Whether you're managing a personal blog, running an online store, or simply organizing your digital content, you will be able to make the necessary tweaks quickly and with minimum effort.
You can:
You don’t need to switch multiple apps or have complicated workflows. Simply open our fast and easy-to-use image resizer and get to optimizing your images for the web.

Easy to use, and, most of all, it remembers patterns.
Dan, Romania
Resize Images Easily, Safely, and Without Signing-Up
You don’t need to be skilled at image editing to use our online tool to resize an image. In fact, you can be a complete novice. There are no unnecessary features that make the whole process too complicated. The ads-free interface is uncluttered and easy to navigate.
Our app is 100% safe and secure. It processes images in your browser. Hence, they will never leave your device, reach our servers or get stored on them. We’ll never gain access to your files. With us, your photos will be well-protected against any potential thieves.
Our image resizer is completely free and available to everyone. You won’t have to create an account, provide your email address or any other personal information. Installation of any plugins isn’t required. You’ll be able to get to work as soon as you open the app.

This is a magnificent application, I have been using it for years and they are always improving and looking for ways to make your work easier. I recommend it to everyone.
Jonathan, United States
Our app can be of use if you need to prepare your high-resolution photos for publishing online.
Posting images on website
When posting images on your website, you should keep in mind that files of smaller size and resolution are going to be loaded faster. In other words, your website visitors will see them quicker. And that’s exactly the experience they expect to get.
Webpages with correctly sized images are better indexed by search engines because the small file size of your visual content accelerates your website’s loading speed. Plus, by using our online tool, you will ensure that your resized images will look just as great as the originals.
Posting images on social media
Changing the width and the height of your images will allow you to correctly prepare them for publication on social networks, where posts, ads, headers, profile pics, and so on have to be of the right size. By resizing images beforehand, you will avoid awkward cropping or unwanted compression that will worsen the quality of the originals, and your photos will look exactly as intended.
Sending photos by email
Our fast and easy-to-use photo resizer can also help if you need to send your photos as email attachments. As you may know, all email services have file size limits. Reducing the size of your images will allow you to attach more of them to your letter.
It can be easily done with the help of our online app. Scroll up to the top of this webpage, import your images, specify the settings and click on “Resize Images”. Your processed copies will be ready for downloading in a heartbeat.
To resize an image proportionally, the original aspect ratio should be maintained. It means that the ratio of the width to the height should remain the same. Otherwise, you might end up with an awkwardly stretched, squished, or distorted image. Most of the resizing options in our image resizer will maintain the original aspect ratio automatically.
If you reduce pixel dimensions of your image, its file size will also be reduced; but not by much. So, additionally, you can try to change the file format and slightly lower the image quality. The best way to make the file size smaller is to compress your image, of course. If you’re using our image resizer, choose the “Convert to JPEG and compress” option in the “File Format” drop-down menu. As a result, you will get a compressed image with new pixel dimensions and a smaller file size.