 by
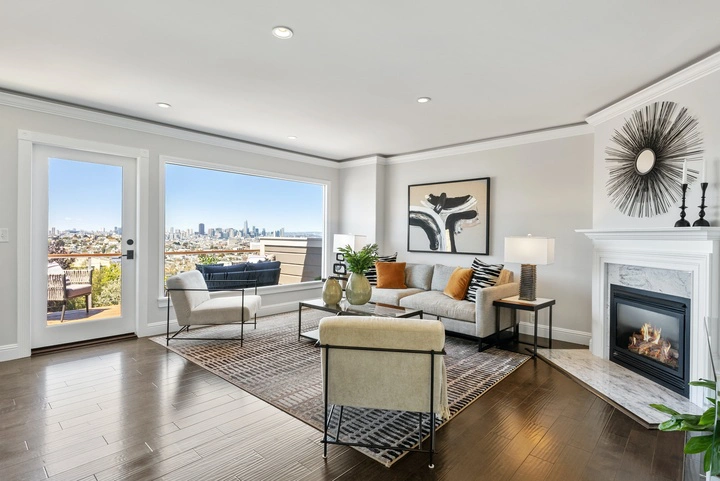
by In real estate, beautiful and professional photographs play a very significant role. As polls show agents who use high-quality and professional real estate photos sell it 32% faster. In this case, we are not talking about pictures that are taken on a regular smartphone – it will not be possible to attract buyers with such images. It’s important to present several high-quality images that will allow people to evaluate the real appearance of the property and even understand from the picture that is the house or apartment they need.
Try to create a professional, high-quality, and very presentable portfolio with pictures of the real estate you are going to sell. Your gallery will become an attractive catalog for buyers, so they will give preference to you rather than competitors.
Do you want to stand out real estate photos among 90% of realtors? Take your time to create professional pictures – to do this, follow our tips, which the article is dedicated to.
Tip №1: Assemble the Necessary Equipment to Create Real Estate Photography
The most important thing for you is the technique needed to create real estate photos. The final result will depend on this. So, the basic lists of equipment that will help you present real estate profitably:
Photo camera
Cameras for creating photos are regularly improved and updated. New, better models appear every year. Of course, creating real estate photos doesn’t require an overly professional camera. It’s enough to choose a model with a good lens that will provide a wide focal length of 24-28 mm.
For real and professional estate photography, you can choose an ultra-wide-angle lens. It will give you maximum opportunities to create attractive pictures, will allow you to cover the whole room and show people what is in the room in one photo.
Pay attention to cameras with high ISO characteristics. It’s better to choose newer models because they are productive. Consider the models from Panasonic, which have an affordable price and good characteristics. To make beautiful real estate photography, pay attention to cameras with such capabilities:
- ISO from 160 to 6400.
- Select the autofocus point.
- Color sensitivity settings.
You can also immediately order lenses that will help you create real estate photos:
- Wide-angle lenses.
- Lenses with image stabilization and others.
Camera Tripod
Don’t you want to get blurry photos with fuzzy lines? Then don’t expect the fact that your hands will be able to stabilize the camera as much as possible and make professional real estate photos. Pay attention to the tripod with long legs so that you can put it anywhere in the room or yard.
The tripod will allow you to make clear real estate photography even in poor lighting when any minimal movement of the camera will lead to blurring.

Tip №2: Think Over the Shooting to the Smallest Detail
When you do real estate photography, you have to try on the role of a professional photographer and buyer. At first, you can take a few standard shots of the object:
- Two photos on a wide-angle lens in the living room, kitchen, bedroom.
- One photo of the bathroom. If the room is spacious and large, then one picture is not enough here.
- One or three photos of the yard, if it is a private house, not an apartment.
- One or two photos of the facade of the house.
- One photo of additional rooms, for example, a garage or a storage room.
Of course, you can supplement the list with more unique and exclusive shots that will allow potential buyers to fall in love with the object only by real estate photography.
When planning or during the shooting you should take into account such moments:
Sunlight. If you are shooting an object from the street, then start shooting in the early morning or early evening, when the sun is softer and more affectionate. Stand only on the side from which the sun illuminates the house – so the shades will be transmitted well and the natural contrast will be preserved.
Cleanliness. If you want your real estate photos to attract buyers, not repel, look around before shooting a photo. Remove unnecessary elements that can negatively affect the overall perception of the room. If you are shooting in a secondary room where people live, tactfully ask them to remove unnecessary items so that they do not get into the camera lens. Explain this by saying that this way you will be able to find a buyer for the object sooner.
Area. Try to capture the widest possible angle to show more. Keep the main things on the level or center. Make the house bright and big.
Plans. Do real estate photography not only with a general plan, try to add close-up shots. Realtors rarely use this technique to attract customers and lose them. If you take a few more detailed real estate photos, you will allow people to see more.
Camera location. No matter what angle you are shooting the property from, always keep the camera straight. This way it will be possible to avoid distortions that can be corrected only through the editor.
Straight lines. During shooting, always make sure that all lines of objects / furniture are straight. This is important both when shooting the interior and when creating an exterior photo.
Always think about what real estate photography will look like. If the camera is too high, then there will be a lot of ceiling and little living space in the photo. If you take it low, you will get a photo of furniture with minimal room capture. So, try to keep the camera straight.
Shooting in the “panorama” mode allows you to cover the space as much as possible. There are no such modes on most cameras (except, for example, Nikon Coolpix), but you can make it yourself by gluing several overlapping images in a special program (for example, ArcSoft Panorama Maker 5 Pro). In this case, take vertical real estate photos to capture more space. If you put the camera on a tripod and turn off auto exposure, you can improve the final results.
Tip №3: If Possible, Don’t Use the Flash if You are Shooting Outdoors
Natural light on real estate photography is the best option. No equipment for artificial lighting creation will be able to convey the shades naturally, as it really looks. Plus, natural lighting will make the photos realistic, then potential buyers will not have an “expectation-reality” difference when viewing the object.
How to take real estate photos in natural light – set the aperture to f8 and adjust the exposure. The longer the focal length of the lens, the more the camera will start to shake, so it’s better to put it on a tripod and turn on the timer so that the picture turns out to be of high quality.
You can take a series of pictures with different settings if your camera supports bracketing mode. How it works – you install the camera in one place, it takes several frames with different exposures. Then you will need to combine the pictures in any editor (like Adobe Photoshop) to capture a large exposure range. So, you will get successful real estate photography, which will present the object favorably.
As for shooting indoors, additional light sources or a flash may be needed here. Be sure to go into the room and estimate the amount of light. Most often, the interior is filled with light from windows and interior lighting. This may not be enough for high-quality images. Therefore, you can add continuous light or install a flash. The latter option is more acceptable because it provides flexibility in interior lighting.
Tip №4: Take the time to process real estate photography
Try to improve the photos you have taken. Improve the colors so that in general real estate photography looks more presentable and professional. If necessary, remove unnecessary elements that may affect the overall perception of the image. You can crop images for that.
You can use various programs to edit real estate photos. For example, online tools – pixlr.com or professional programs from Adobe: Photoshop or Lightroom. The latter programs offer a variety of tools for cropping, color correction of images. In the programs, you can independently enhance the clarity of details, change saturation settings, and more.
The photo editing process is very important when creating real estate photos. Even if you prepare for shooting as much as possible, the result may be pictured with a curved exposure, a broken horizon, sharp shadows, or insufficient light. All this can be eliminated with the help of the editor.
However, don’t strong processing of real estate photos, because it’s important to preserve the naturalness of the object so as not to mislead potential buyers.
Tip №5: Ensure Copyright Protection for Your Real Estate Photos
Imagine that you have invested time, effort, money in creating content to promote real estate, and someone shamelessly decided to steal all your works. It’s a shame, isn’t it? And this is quite possible because if you don’t protect your real estate photos, other realtors and agencies will be able to easily save photos and post them on their platforms. Then it may happen that people will choose this object for purchase because they like the photo, but they will not pay the commission to you.
To prevent such situations and exclude copyright infringement, apply a watermark on your real estate photos.
A watermark can be the logo of your brand (agency), phone number, website, first and last name, or any other designating symbol. This way you will indicate the affiliation of real estate photos to your agency when publishing on the website, various sites. And no one will be able to copy them and put them as their content.
The main thing to remember is that too noticeable and large watermarks can make it difficult to see images. So, buyers will not be able to evaluate the object and are unlikely to sign up for viewing.
Follow these rules when adding a watermark on photos:
- Place it on the full screen, but make it transparent so as not to prevent people from evaluating the object.
- Do not make the watermark too small and do not place it in places with a solid background – it can be masked in any editor.
- Do not place the watermark in the corner of the picture, where it can be easily cropped without losing the essence of the picture.
How to apply a watermark on real estate photography
You can quickly and easily apply a watermark to real estate photos using our simple Visual Watermark software. It’s a professional tool for copyright protection of your content and its identification by adding watermarks.
With Visual Watermark creator, you can easily protect your work and works from theft, show competitors and customers that you work honestly, responsibly, and professionally. Be sure, this approach to work will be highly appreciated by real estate buyers.
If you have your first real estate shooting ahead of you, be sure to write down these tips for yourself and follow them. Remember that you are not taking photos for yourself, but for customers. Therefore, try using real estate photography to show all the advantages of the object and also its flaws, if they are significant and affect the cost.

Don’t spend a lot of money on equipment, analyze all the expenses and make an optimal contribution to the equipment – it should fully pay for itself. Be sure to reveal the creative side of photography (angles, composition, perspectives). As the number of your real estate photography increase, your results will get better and better! And it will definitely bring a result in the form of a good profit.